Introduction:
Take2 Technologies has developed ProctorLink, a rapidly deployable proctoring solution for the Moodle™ LMS, and it monitors the quiz by capturing the user’s activity with the webcam at custom-specified intervals. It performs identity verification by checking the candidate’s image against the proctoring images captured during the quiz.
Also, it warns the candidate if any deviation from properly attempting the quiz is detected. You can set the number of warnings and the time interval between the image capturing.
We envision the teachers using this plugin to conduct hassle-free online proctored exams.
Installation:
- You can download the plugin from Moodle™ Plugin Directory and install it by going to your Moodle™ site as an administrator. Navigate to the Site administration -> Plugins -> Install plugins. Upload the downloaded plugin ZIP file and complete the installation by following the on-screen instructions.
- Or you can download the zip file, extract the folder, and copy the ‘quizproctoring’ folder into root/mod/quiz/accessrule/.
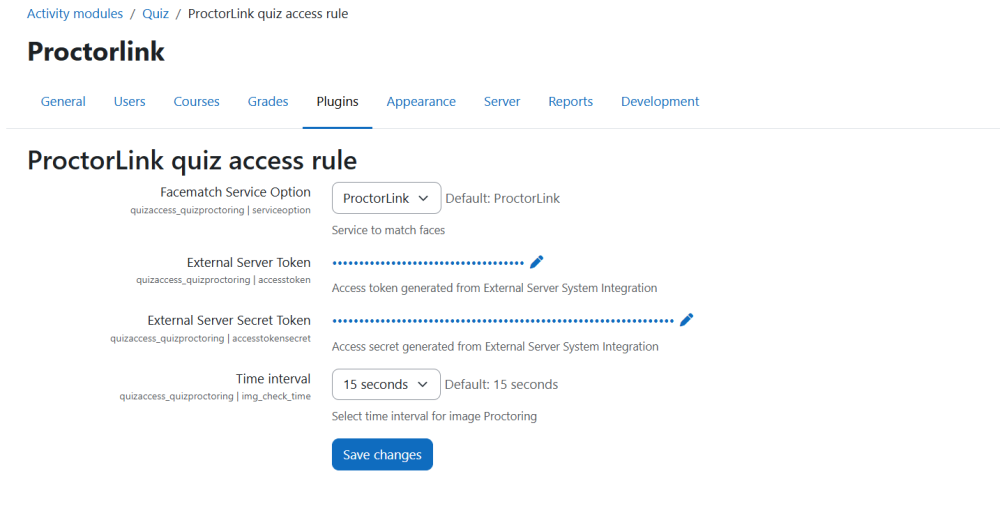
ProctorLink Configuration for Moodle™
External Server Token and Secret Token
The required External Server Token and Secret Token are preconfigured for your site. No additional setup is needed from your end. Simply install the ProctorLink plugin and enable the proctoring within the quiz to start using the proctoring features immediately.
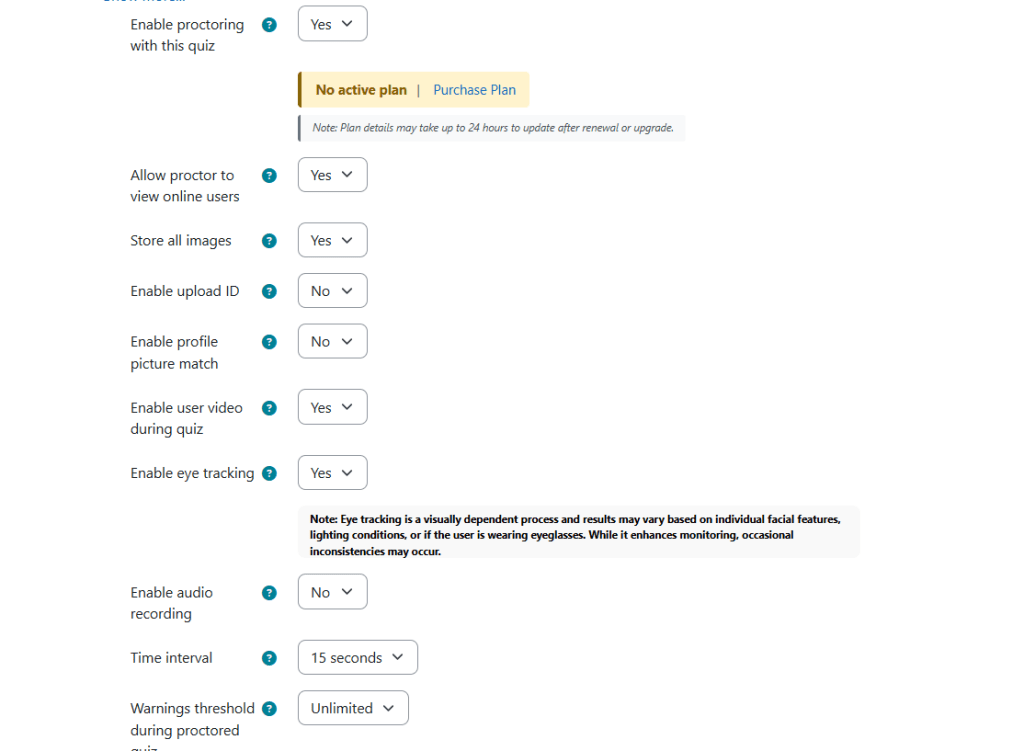
Enable Proctoring for a Quiz:
Once the plugin is installed follow these instructions to enable proctoring for the quiz:
- Go to your course and turn on Edit Mode.
- Add a quiz from Add an activity or resource; or If you already have a quiz, Go to Edit Settings of the quiz.
- In the Extra restrictions on attempts section, select yes to enable the proctoring for the quiz.
- Set up the Time interval between the proctoring image capturing, during the quiz.
- Set up the number of warnings to be issued from Warnings Threshold During proctored exam.
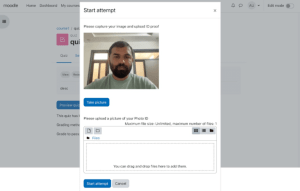
Student/User Proctoring Interface:
When the quiz is adequately configured, the participants can attempt the quiz in the proctoring interface.
The student/user will be asked to capture an image before attempting the quiz. This image will be validated against the warning images captured during the quiz and will be displayed as the ‘main image’ in the Proctoring Images Button in the Review Attempts of the participant.
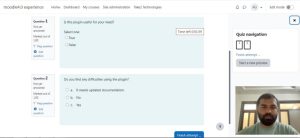
Upon the start of the quiz, The interface will look like this:
Advanced Reporting and Audit Insights:
An Advanced Reporting button “View Proctoring Report” has been introduced on the quiz page, accessible to both administrators and teachers with the appropriate permissions. This enhanced feature provides a centralized dashboard where authorized users can thoroughly review each participant’s quiz activity, including the full history of attempts, exact exam duration, all captured images, and any recorded audio during the assessment. Additionally, it allows users to generate detailed PDF reports that consolidate this information, offering a comprehensive tool for auditing, performance evaluation, compliance verification, and long-term record-keeping. The reporting interface is designed to be intuitive, enabling educators to quickly identify irregularities, track student engagement, and maintain a transparent and secure assessment process.
User Role Permission:
Site admin can assign user role permission to View the “View Proctoring Report” and “View Online Users” buttons.
To assign this permission- go to Site Administration -> Users -> Define Roles -> Click the gear icon of any role -> mark the

checkbox to allow.
The following permission checkboxes are available within ProctorLink:
- View Online Students during Proctoring
quizaccess/quizproctoring — Allow - View Proctoring Report
quizaccess/quizproctoring — Allow - View Proctoring Images and Proctoring Identity buttons
quizaccess/quizproctoring — Allow
Note: In the plugin, the permission to View the Proctoring Images and Proctoring Identity buttons are allowed to the non-editing teacher by default.